Electric Guitar Shielding
Why Electric Guitar Shielding?
> Self adhesive copper foil sheets / strips - probably the best material but most expensive
> Self adhesive silver foil sheets / strips - nearly as good as copper and cheaper
> Conductive paint - easier to work with, but not such a 'solid' finish

This section describes the steps for a self adhesive foil example.
For all of the steps its easiest to pre-cut the pieces to a fit their areas with around 1/4" over-size to allow overlap with adjoining pieces. To ensure an electrical connection between adjoining pieces once stuck in place, use a sharp pointed object (e.g. a nail) to push through the top overlapping sheet into the piece below. Do this every 2 inches or so along overlaps. Then use a resistance meter if available to ensure electrical continuity between the different pieces, ensuring maximum guitar shielding.
Suggested order of work:
> Coat the inside of the jack socket cavity. Use one piece to do the oval shaped bottom and a strip to run around the sides that overlaps itself and the bottom. This side piece should not protrude over the top of the cavity.
> Add a small tab of foil that runs up the inside of the jack socket well and then protrudes over the top of the body and covers the screw-hole nearest the bridge where one of the jack-plate securing screws goes. This will connect the 'earthed' jack plate to the socket cavity shielding to electrically complete the shielding.
> As a precaution, adding some insulated tape on top of the new foil in the area where the jack socket tip will be ensures the guitar signal is not accidentally shorted to earth.
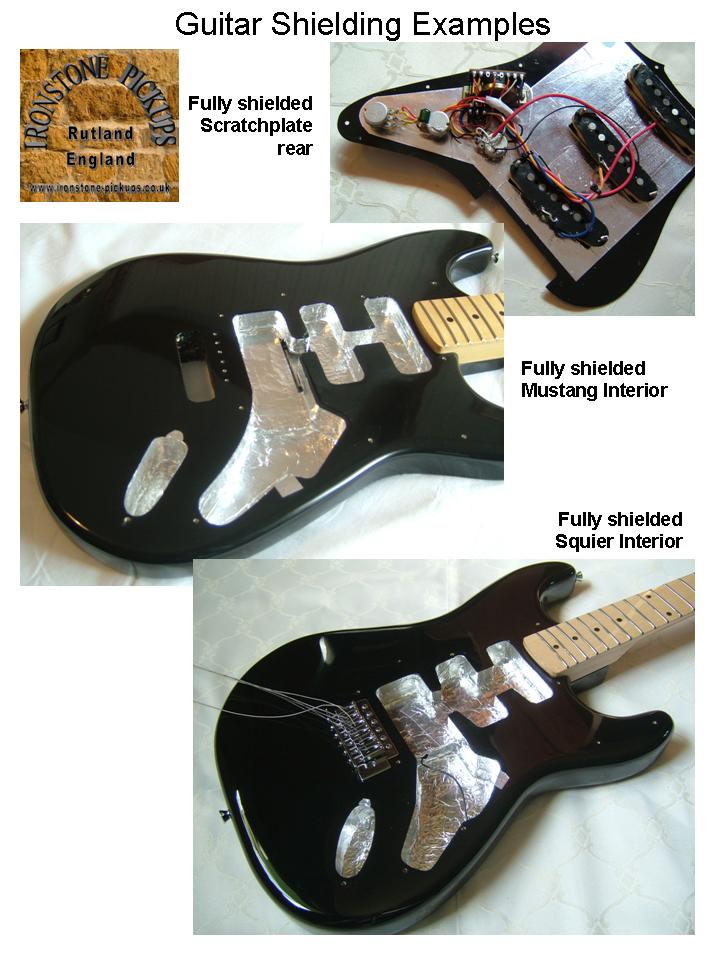
> Follow a similar process for the main body cavities including the pickup wells. Each body varies slightly and several overlapping pieces of foil will be need to cover all of the bottom areas. Ensure they are electrically connected as described above.
> Now coat the sides, again typically using several pieces of foil due to the differing depths of the cavity.
> Add another small foil tab that comes up the control cavity side wall and over the screw hole that secures the scratchplate near the lower middle of the guitar body (see second & third picture). This will be the electrical connection to the scratchplate shielding.
For the very best guitar shielding, the scratchplate foil triangle should be extended as shown to cover the entire pickup are as well.
