Gilmour Scratchplate Wiring

Ironstone Custom Logo
 

Gilmour Scratchplate Wiring

 
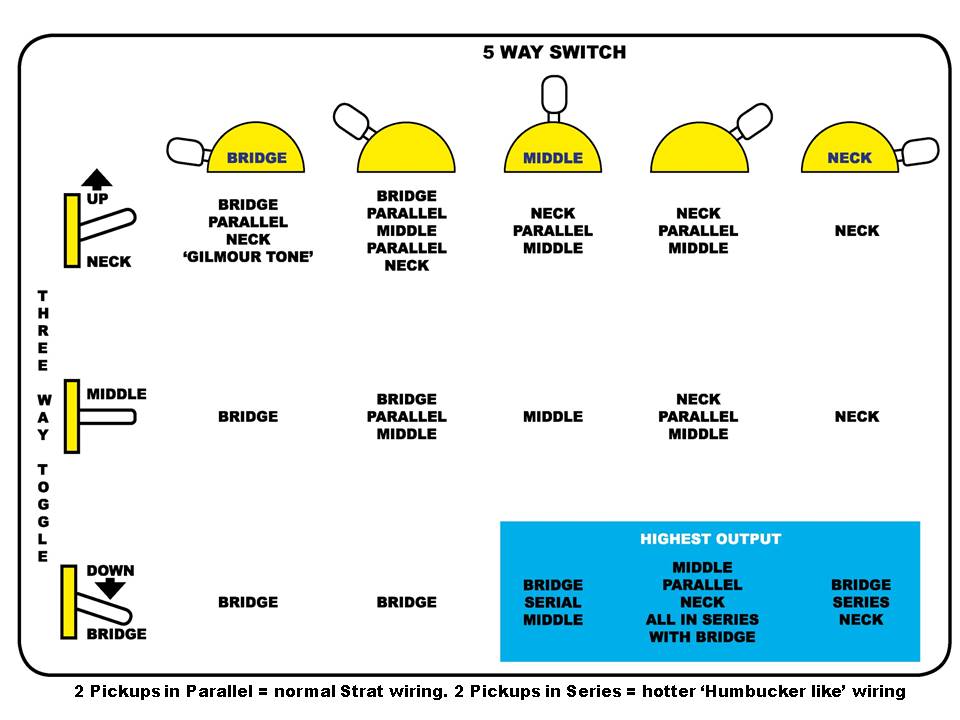
The installation of the Ironstone 'Black Strat' Scratchplate is quite straightforward for anyone with some basic soldering skills. As the picture below demonstrates, the Gilmour scratchplate wiring is a complex, but self-contained switching system. This construction simply leaves only the normal scratchplate 3 connections to make and its very easy to test the installation prior to re-assembly (and re-stringing) with no more than your normal amplifier and a small screwdriver. 

Gilmour scratchplate wiring


As the photo shows there are 2 physical cables.

> The thinner green wire feeds through a small hole in the body to the rear compartment where the tremolo springs are located. It should be soldered onto the 'claw' arrangement that holds the springs. This electrically connects the whole bridge and string assembly to the guitars earth point (at the volume control potentiometer body).

> The thicker cable actually contains 2 separate wires. The whole cable feeds through a small sloping hole into the guitar jack socket compartment.
The outer or 'sheath / shield' connection (pre-tinned silver) connects to the jack socket terminal that normally makes electrical contact with the jack plugs body. Plug a jack into the socket and this will be visually obvious.
The inner wire in its own coloured plastic sheath is the actual output signal. It should be connected to the jack socket terminal that will make contact with the jack plugs tip.

> Take care when soldering and arranging the 2 wires onto the jack socket. If they come into contact the guitars output will be shorted to earth. This will not cause any damage - but there will not be any signal out fro the guitar!
A fairly common mistake is to connect the 2 jack socket leads the wrong way round. If you do this you will get a functioning guitar and output, but it will have a lot of hum and noise which will get worse if you touch the strings or the main guitar metalwork. If that is the case, simply reverse the 2 connections at the jack socket and re-test.
 

Having completed the wiring, its worth a quick test that all is well before screwing everything down / re-stringing etc. Connect your amp and guitar up as normal. Select a pickup on the 5 way switch and with the guitar volume at 3 or 4 and your amp turned low, gently tap the selected pup with a small screwdriver or similar. You should hear a very clear 'thunk' from the speakers (that is why the amp needs to be on low). That confirms that the signal path is correctly wired. There should not be any abnormal hum, noise etc.

The 'tap test' is also a good way to familiarise yourself with which pups are selected via the complex switching circuitry of this plate. The following visual guide is a handy reference.

Gilmour Plate 3 Way Toggle switching


Gilmour Scratchplate with Bridge Blender Option

The mini toggle switch in this option not only has its 'Normal 5 way' and 'Bridge in Series' modes, but also activates the Bridge Blender pot.
So when the mini toggle is moved forwards (towards the Neck), the bridge blender pot is activated, enabling a 0 to 100% blending of the Bridge pickup into 3 of the 5 way settings;
Middle + Bridge Blend
Middle + Neck + Bridge Blend
Neck + Bridge Blend (i.e. Gilmour tone)

It does mean you only have one tone pot, but that can be configured to control all 3 pickups, a 'Master' tone control, or any combination of the 3 pickups as required. The Bridge Blender option is available with the full range of Strat pickup style options too!Gilmour Plate Bridge Blender switching