Tony Partridge: Ironstone Pickups
Welcome to Ironstone Pickups, some of the best guitar pickups for value, tone and customer service. Every set hand finished and tested in Ironstone’s Rutland workshop.
Read moreA professionally hand wired, fully tested scratchplate / pickguard, with unique pickup switching. Ironstone also offer a 5 way Telecaster control plate and pickup set.
Read more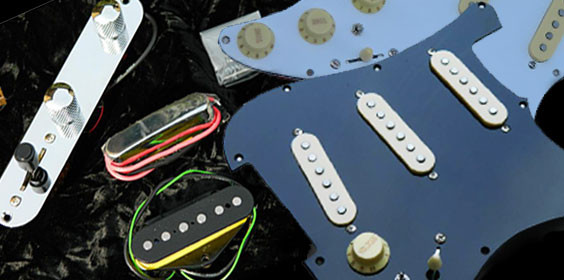
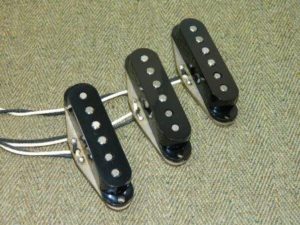
The Ironstone Jazz Bass pickups feature classic 7.3K bridge and 7.1K Ohm neck resistances for rich, but crisp vintage tones. Fibre bobbins and cloth wire adds to the vintage vibe.
Read more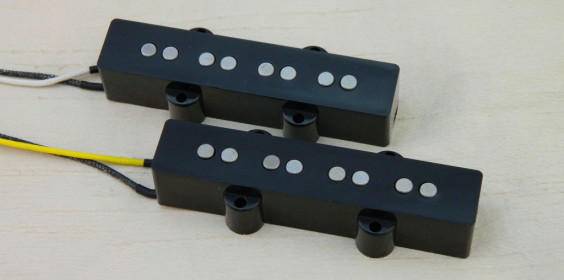
Customer service and technical support are a big part of the Ironstone 'package'. Use the Support tab for free articles and advice on a wide range of guitar topics.
Read more
Tony Partridge: Ironstone Pickups
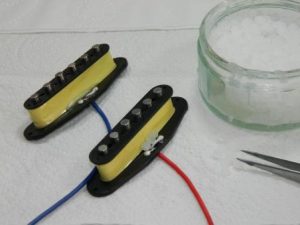
The first part of the building single coil guitar pickups blog focussed on initial checking and preparation of the pickups. That included hand setting the distinctive Hybrid pole piece stagger pattern.
So now the pickups are ready for wax potting in a wax bath.

Wax potting is simply the immersion of pickups in hot, liquefied wax. Because the liquid wax penetrates into the wound coil, it drives out small air pockets. When the pickup cools, the wax 'solidifies' and thus binds all of the coil mechanically. This then stops the individual windings vibrating which causes the phenomena of microphonic feedback (squealing).
Additionally, the pole pieces which were manually set are 'glued' in place by the waxing process.

Wax is used because it moves between solid and liquid state easily, whilst retaining a 'pliable' solidity at room temperature. I use a 4 part paraffin wax to 1 part beeswax mixture, in the form of small easy melt pellets. These are visible on the un-melted surface of the wax bath below.
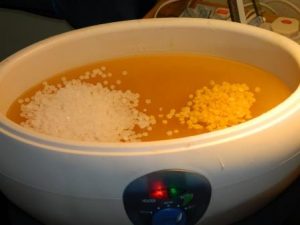
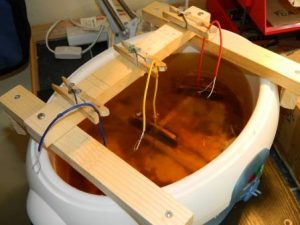
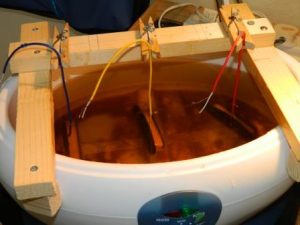
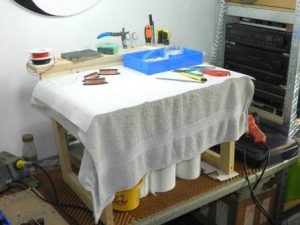
When building single coil guitar pickups of a higher resistance (thus more windings), the key stage is deep wax potting. The bath itself is a (relatively) low temperature unit, of the kind used for health / cosmetic wax procedures. The advantage is that the pickups can be left in for 20 + minutes, with little risk of any harm compared to higher temperature units. This ensures a thorough heat penetration throughout.
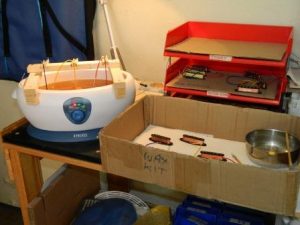
A wooden jig suspends 3 pickups at a time (i.e. a Stratocaster set) in the bath, thermostatically held at a consistent temperature. An insulating cloth covers the top, preventing the wax surface starting to 'film'. After about 10 minutes, a few gentle taps on each pickup with a wooden (chop!) stick knock out stubborn air bubbles to encourage a full wax filling.
 After the timed immersion period, each pickup is withdrawn and a hot air gun used to blow off excess liquid wax. The pickups are then set to rest for a while on absorbent paper before the next manual steps.
We visually inspect the pickups having cooled a little to ensure a full wax penetration and, if needed, that the wiring to the bobbin eyelets is not mechanically stressed.
With everything OK, the pickups are taped. I use high temperature 'transformer' tape, which, when applied tightly, bonds to the still warm wax and copper windings. This both seals the coil to prevent mechanical damage and squeezes the still soft wax. That maximises the coil mechanical stability. With the taping in place, another electrical resistance check is done. Because the coil is still warm, the reading is not accurate, but it will show that the coil and connections are all electrically intact.
With the pickups confirmed as electrically sound, a mechanical cleaning can occur. The wax process leaves a thin film over the entire surface of the pickups. While the idea is not to completely remove that, some cleaning makes cosmetic sense. A fine emery pad is used to remove wax from the exposed pieces themselves and gives a bright visual finish.
The rest of the resin is then lightly brushed with a scouring pad to remove any debris and unwanted wax deposits. Care must be taken at this stage not to brush across the small sections of exposed winding wire.


We find the connection of the hair thin windings to the bobbin eyelets is the most delicate part of a completed pickup. So 2 or 3 pellets of the same wax that was used in the bath is carefully melted with a small soldering iron tip over the 2 eyelet joints. Once dry, this small wax coating prevents accidental handing damage, but remains soft enough to allow for mechanical movement and temperature changes.
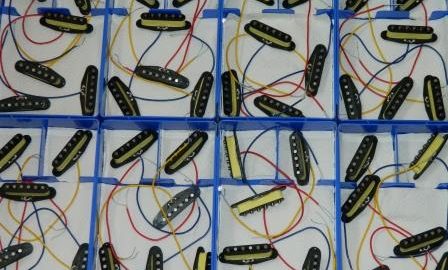
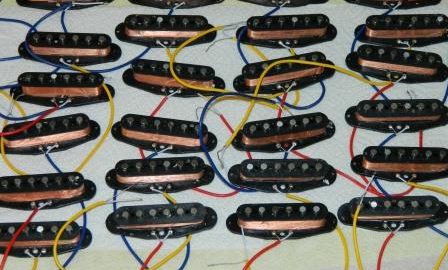
Building single coil guitar pickups like the Ironstone Hybrids in batches of around 20 pickup sets (60 pieces), gives about a day's worth of continuous flow wax potting.
Because the potting process significantly heats the copper wire coils, they are then left to 'rest' back to room temperature overnight before a final accurate measurement. That confirms they are within the stated 5 % +/- tolerance.We can then package up the fully prepared pickups, with associated screws set, tubing and information card. A new set of pickups is ready for Live stock!
So that is the full process for building single coil guitar pickups here at Ironstone, like the Hybrids. Different pickup styles have different operations (e.g. the Tele bridge pickup has a base plate hot glue process ). But the basics are the very much the same. I hope these 2 blogs give a good summary of what goes into the Ironstone Hybrid pickups.
And some related articles;
Single coil guitar pickups (Wikipedia)
StewMac on wax potting pickups
Building single coil pickups; Hybrids part 1
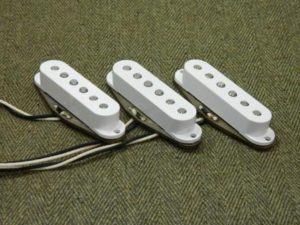
Building single coil pickups is surrounded in history, myth, and (understandably) great interest. A home DIY builder, a big player, or a smaller family enterprise like Ironstone, all need to go through a similar series of build stages. This Blog series focuses on Ironstone's 'Hybrid' single coil Stratocaster pickups.
The name comes from their design being a mix / hybrid of traditional construction (Alnico V magnets with vintage pole stagger), and modern materials (shielded cable and resin bobbin rather than fibre flatwork). These blogs follow the production steps from beginning to end. So you can see what goes into the final product. Welcome to the workshop!
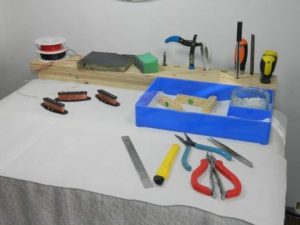
The Ironstone workshop has several workstations set out for different tasks. Building single coil pickups is just so much more efficient with everything to hand.
The design began by Ironstone determining the specification of the pickups, explained in the 'About us' section of this website. The actual winding process is then sub-contracted to keep costs down. Whilst hand 'scatter-wound' pickups can be sonically excellent, they are time consuming and thus expensive to produce.
So these pre-wound bobbins form the starting point for the Hybrid set.
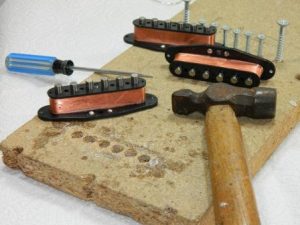
 Basic checks all the way through the process are at the heart of Ironstone quality control. The pole pieces are supplied as a 'default' pattern used on some other Ironstone Strat styles. So, the first job is checking all of the pole piece orientations.
That means checking the middle pickup is reverse magnetic polarity to the other two. Then the individual poles are checked for correct mounting, i.e. all 6 in a pickup are the same way round.
These checks are done simply by the law of 'opposites attract' with other magnets.
Basic checks all the way through the process are at the heart of Ironstone quality control. The pole pieces are supplied as a 'default' pattern used on some other Ironstone Strat styles. So, the first job is checking all of the pole piece orientations.
That means checking the middle pickup is reverse magnetic polarity to the other two. Then the individual poles are checked for correct mounting, i.e. all 6 in a pickup are the same way round.
These checks are done simply by the law of 'opposites attract' with other magnets.

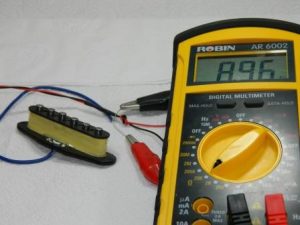
All Ironstone pickups are built to an electrical specification with a +/- 5% tolerance on DC resistance. So an initial check determines coil continuity, and that it is within the required resistance range. Here, a Hybrid Bridge pickup specified at 9.0K is measured, and this particular one is exactly on spec.

An advantages of modern synthetic resin bobbins, is that the pole pieces sit in 'silos' through the bobbin. So different pole piece stagger patterns can be produced by moving the cylindrical pole pieces in those silos.
Traditional flatwork construction is fixed once assembled.
The logic and myth behind pole piece stagger is fully explored in the support page 'Staggered Pole Pieces' .
The Hybrid's use a 'quasi vintage' pattern. That takes into account modern string types, yet provides significantly better string matching than flat pole designs. Using a simple jig, the pole pieces are first gently tapped further out / up from the bobbin .
 The poles are then individually reset by hand to the custom Hybrid pattern. Its the relative height of the poles that matters rather than the absolute height above the pickup. The measurements for the Hybrids are set against reference pickup covers, measured in mm;
E (bass) 1mm
A 1.5mm
D 2.0mm
G 1.5mm
B 1.0mm
E (treble) 1.25mm
The poles are then individually reset by hand to the custom Hybrid pattern. Its the relative height of the poles that matters rather than the absolute height above the pickup. The measurements for the Hybrids are set against reference pickup covers, measured in mm;
E (bass) 1mm
A 1.5mm
D 2.0mm
G 1.5mm
B 1.0mm
E (treble) 1.25mm
 Even though the pole pieces are free to move in the bobbins, they still have a small contact area with the windings. So once all 6 poles in a pickup have been re-positioned, its time for another quick electrical continuity check. With care, very few problems occur, but its probably not a good thing for a DIYer to try with their favourite pickup.
Resin bobbins are sometimes criticised for being a sonically inferior alternative to 'conventional' fibre flatwork construction. That is a debatable effect.
A factor that is rarely mentioned though, is that a bigger influence on tone is the winding coils cross-section. Simply, a taller thinner coil section generates a brighter tone. A squatter wide coil gives a fatter tone with more mid-range.
Any given length (resistance) of winding wire has a longer path round the bulkier inner part of a resin bobbin. That tends to give a thinner coil with greater tonal clarity and sweet treble.
Even though the pole pieces are free to move in the bobbins, they still have a small contact area with the windings. So once all 6 poles in a pickup have been re-positioned, its time for another quick electrical continuity check. With care, very few problems occur, but its probably not a good thing for a DIYer to try with their favourite pickup.
Resin bobbins are sometimes criticised for being a sonically inferior alternative to 'conventional' fibre flatwork construction. That is a debatable effect.
A factor that is rarely mentioned though, is that a bigger influence on tone is the winding coils cross-section. Simply, a taller thinner coil section generates a brighter tone. A squatter wide coil gives a fatter tone with more mid-range.
Any given length (resistance) of winding wire has a longer path round the bulkier inner part of a resin bobbin. That tends to give a thinner coil with greater tonal clarity and sweet treble.
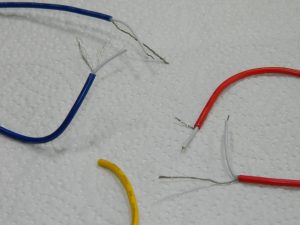
Having tested the pickups are electrically intact, the connecting cables are soldered into place. The majority of ironstone pickups use a shielded style cable. A single inner conductor / wire (the positive side of the guitar signal) is contained within an outer braid of wire. When connected to the guitar's ground, that acts as both the signal negative side and shields the inner signal wire from electrical noise. The pickup connections are the longest wire runs in most guitars, i.e. most sensitive to unwanted electrical noise pickup. Its the use of this shielding that contributes to the Ironstone's exceptionally quiet 'background'. For connection tips see; Ironstone guitar wiring

The Ironstone Hybrids are produced in batches of around 20 pickup sets (60 pieces). The reason for this is that the next step is wax potting, a full 20+ minute wax bath to seal the windings. That is an all day task with 20 sets! The Hybrid's have the greatest amount of manual input and skill of the Ironstone resin bobbin Stratocaster range. This is demonstrated in the second part of the blog. It will focus on the remaining processes, wax potting, (more) electrical checking, taping, finishing (and final checking!). Check out the Ironstone 'Building single coil pickups part 2' blog, coming soon.
And some related articles;
Single coil guitar pickups (Wikipedia)
StewMac single coil pickup kit construction
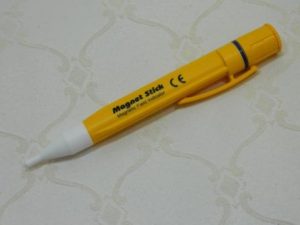
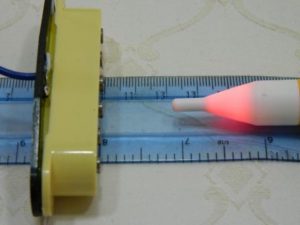
Exploring Alnico Ceramic magnet combinations follows on from the first part of this Blog (see Mixed Magnets 1) which looked at pickups with mixed Alnico magnets, i.e. the tonal effects of different magnet grades in different pickups and positions. This Blog focuses on exploiting a mixture of different kinds of magnets additively. By that I mean adding the magnetic strength of magnets together. To demonstrate I have used a trusty 'magnet stick', a simple magnetic field detector that can be used to give an easy visual reference of the distance from a magnet its field strength reaches a constant threshold.
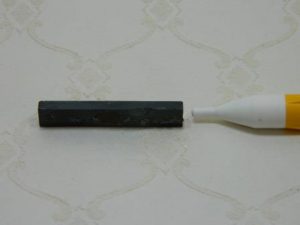
 Ceramic (also known as Ferrite) magnets differ from Alnicos in their chemical composition being based primarily on iron oxide with other additives. They are physically more brittle but typically 'stronger'. To clarify, that means when fully magnetised (saturated) they sustain a stronger magnetic field than saturated Alnicos. The style used in guitar pickups are normally in bar form. the larger faces are the 2 poles so no field is detected around the edges.
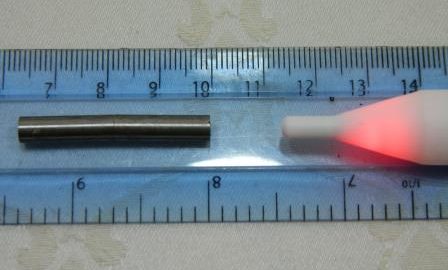
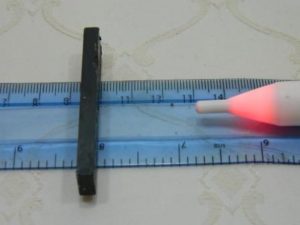
 So to assess a ceramic bars field strength, the photo below shows one placed at the 10cm point of a ruler and the detector moved up to the first point it detects and illuminates, approximately 30mm away.
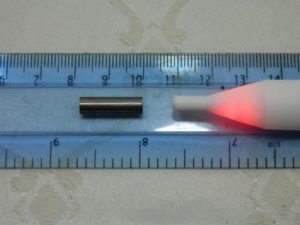
 Doing the same test with a single Alnico (V) pole piece gives a detection distance of approximately 8mm. This is a much smaller mass of magnetic material of course.
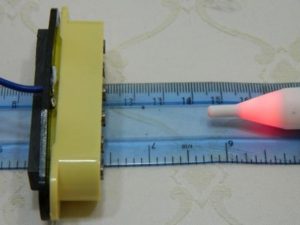
So far so good, but the interesting magnet phenomenon is adding Alnico Ceramic magnets together and the effect it has on magnetic strength. So starting with a normal Ironstone Alnico V magnet pickup, the distance for field detection is around 22mm.
 Because ceramic bar magnets have their large faces as poles, its easy to simply place one onto the bottom of the basic Alnico pickup. The magnet will soon let you know if you are trying to put it on with the incorrect polarity!
Running the same field detection test gives a much stronger combined field output from the pickup magnetic 'system', close to 35mm. Wow! And bare in mind a magnets field strength is inversely proportional to distance squared. Or simply put, double the distance and the field strength goes down to one quarter of the original value.
Because ceramic bar magnets have their large faces as poles, its easy to simply place one onto the bottom of the basic Alnico pickup. The magnet will soon let you know if you are trying to put it on with the incorrect polarity!
Running the same field detection test gives a much stronger combined field output from the pickup magnetic 'system', close to 35mm. Wow! And bare in mind a magnets field strength is inversely proportional to distance squared. Or simply put, double the distance and the field strength goes down to one quarter of the original value.
 So clearly, this modified 'combination' pickup is going to be more sensitive to string vibrations than either style of pickup magnets on their own.
This is real easy home experimentation for you to try yourself too. Ceramic pickups are available cheaply - you may even have some duds laying in the spares box. As I mentioned before, ceramics are brittle so well glued examples may break as you try to prise them off the donor pup. Patience, patience.
So clearly, this modified 'combination' pickup is going to be more sensitive to string vibrations than either style of pickup magnets on their own.
This is real easy home experimentation for you to try yourself too. Ceramic pickups are available cheaply - you may even have some duds laying in the spares box. As I mentioned before, ceramics are brittle so well glued examples may break as you try to prise them off the donor pup. Patience, patience.
This DIY experimentation is simple, cheap and good fun, but of course the proof is in the hearing. Well I have done quite a lot of test playing using a Strat that is modified for easy pickup tinkering without de-stringing etc. So I am able to get close to instant comparisons.
Pickup Output;
Its no surprise to hear that a ceramic 'enhanced' Alnico pickup in any position sounds louder. But its not as dramatic effect as the experiments above would suggest. More like upgrading to higher resistance single coils than installing a humbucker for example. Conventional logic is that stronger magnets tend to kill sustain. Well this combination does not seem to have any negative impact on the time for a plucked open string to audibly decay.
I suspect both of these effects are due to the ceramic magnet acting 'through' the Alnico's, just don't quote me on that!
Pickup Tone;
The burning question! The characteristics of the 2 magnets types are well documented -
Alnico for warm, mellow vintage tones
Ceramic for sharper, more aggressive 'modern' tones
So which if either 'wins' out? Again I am not talking from a physics perspective, just what I hear. And the clear answer is its the Alnico's that predominate. The classic Strat vintage tones (like around the neck tones when played 12th fret for example) are very much there. But for me what the Ceramic adds is an extra 'crispness' that allows the Alnicos just a little more bite. That, coupled with the volume increase effect is an interesting and very usable overall effect.
This is such a cheap and simple DIY mod, that its worthy of some experimentation. Physically its an easy mod to do and to try various combinations. In fact due to the magnetic attraction, you don't even need to glue the bar magnet(s) in place for tinkering.
And there are several ways to do the 'enhancement', either on all 3 pickups or just a particular one (e.g. to get more power and bite from a bridge). Its a great way of 'upgrading' a relatively low output set (say 6kOhms) to get a much rockier feel. A bit like going from Ironstone Golds to Platinums.
So I say, get out the spares box, have a bit of a tinker, and see what Alnico Ceramic magnets can do in combination for your tone!.
And some related articles;
The difference between Alnico and Ceramic magnets
Magnets by Bill Lawrence
Guitar Pickup Myths

"Ironstone's latest pickups"
...................................................
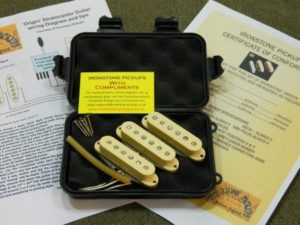
Ironstone 'Origin' vintage Strat pickups:
The latest, flagship vintage Strat pickups from Ironstone.
The Origins - Classic 50's and early 60's tones - no compromise:
For all playing styles and Artist tones from the fabulous early Fender era of the 50's and early 60's. Designed to recreate the warm, clear bell-like tones from a combination of original design specifications with a very modern mixed magnet twist.
These combine wholly traditional elements; fibre bobbins, vintage stagger pole pieces, push back wiring and 42 AWG windings. But add to that a 'boutique' mixed combination of Alnico 3 and V magnets across all 3 positions, for a very special vintage Strat pickups tone and playing experience.
These are available with white, cream or black covers and come with all mounting hardware. Supplied in a protective foam presentation box complete with Certificate of Conformity.
![]()


Since Ironstone Pickups began selling Jazz Bass pickups in 2015, its become clear that, just like with their 6 string counter-parts, Jazz Bass players love the warmth and openness of tone that comes from the Jazz Bass single coil pickup design. But as any single coil, they are also susceptible to the unwanted electrical noise that the pickup interprets as signal. Sadly us humans detect that as noise not signal!
So assuming you want to keep your Jazz Bass tone and not opt for the Precision Bass humbucker pickup tone what can you do?
Types of electrical noise.
In an earlier Blog, I covered the types of electrical noise single coils are susceptible to. Check out the Blog;
Single Coil Pickup Dummy Coil

In that Blog I divide guitar noise into 2 basic elements, low frequency hum and higher frequency buzz (pretty commonly used terms). The most effective 'answer' to buzz is shielding.
See my Support page on the topic. Its aimed at 6 strings, but the principles are the same.
Electric guitar shielding
Hum is linked to magnetic fields created by mains power circuitry, so dominated by the frequency of the mains electrical system (50Hz here in the UK for example). Shielding will not remove hum, for that you need noise cancelling technology, and that's where dummy coils come in.
In the previous dummy coil Blog I covered the basics of pickup design and how a dummy coil can help. Also check out;
Electric Guitar Pickups Explained
So coming back to noise cancelling, this simply means adding an electrical signal containing unwanted noise to another signal containing the 'negative' or 'inverse' of that same noise. This cancelling (or 'bucking') of the hum is the principle of the humbucker design. So the humbucker (as found in a Precision Bass) is a very elegant hum cancelling solution, but the tonal characteristic is of course very different to that of a single coil.
Enter the Jazz Bass dummy coil.
So if you want your Jazz Bass pickups to keeps their tonal characteristic, where next? Well that is where the dummy coil approach comes in. Basically, a dummy coil can simply be a single coil without a magnetic component. The key requirement is that the dummy coil has its windings and / or its physical up / down orientation arranged to be in opposition to the live coil(s).
A dummy coil of around 80% of the live coils resistance value gives an excellent noise cancellation whilst leaving some 'life' in the signal which is so critical to single coil tone.
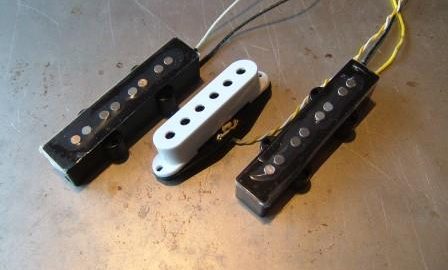
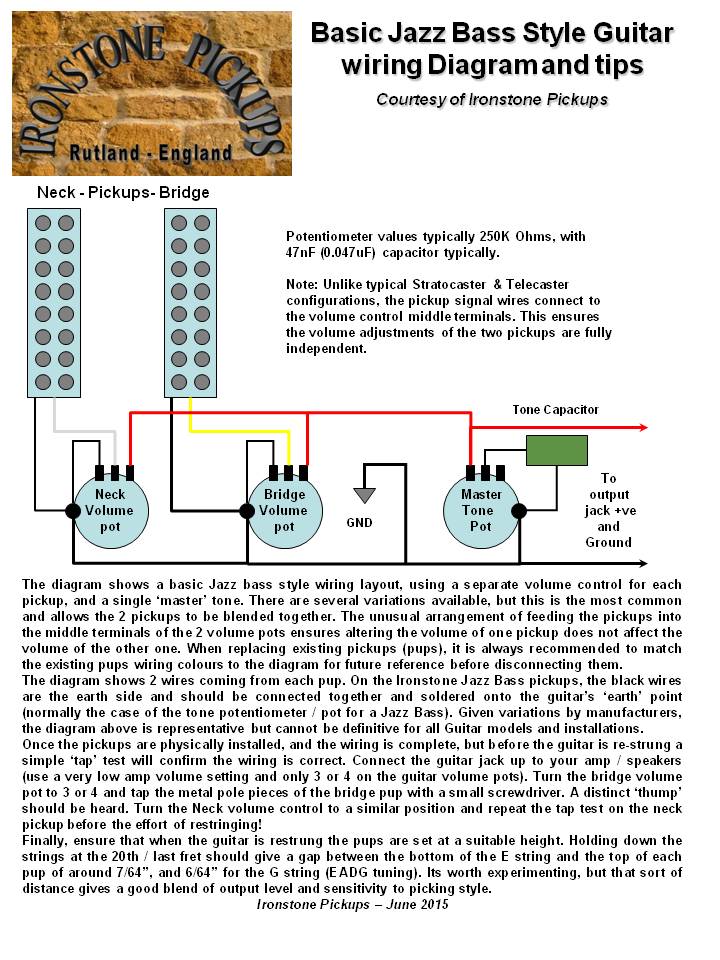
Now the tricky bit to installing a Jazz Bass dummy coil is that unlike (say) a Stratocaster, standardly configured jazz Bass guitars use a volume blend system not a distinct switch. This is further complicated by the fact the 2 Jazz Bass pickups will typically be RWRP (Reverse Wound Reverse Polarity) to each other. Since dummy coils have to be wound / connected in the reverse sense to the 'active' coil, the implication is that 2 dummy coils are needed. A standard Jazz Bass wiring schematic is shown below.
So my design goals evolved as the following;
1) Optimise the design to use just one dummy coil
2) Make the design easily compatible with standard 2 volume control, RWRP pickup Jazz Bass wiring
3) allow the players favourite 'both pickups at full volume' position to remain
4) provide hum cancelling for both bridge and neck pickups across their full volume control range.
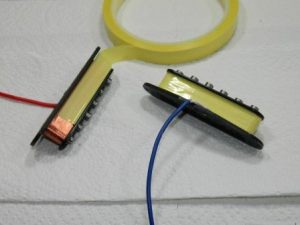
It took a bit of experimentation, but it is possible to achieve all of the above with a simple dummy coil installation.The dummy coil is based on a Stratocaster pickup and with the simple use of some double sided tape can be mounted on the base of the standard Jazz Bass control plate potentiometers.
How does the Jazz Bass Dummy Coil sound?
As with any dummy coil installation, the Jazz Bass dummy coil set-up gives a reduction in overall output volume (approx. 10-15%). This is not surprising as the dummy coil is effectively subtracting from the live coils signal. More importantly, a huge proportion of the background hum will have gone, for both the bridge or neck selected at any volume individually.
The usual comment about dummy coils used on 6 string guitars is that the resulting tone has a drop in treble. It's a subjective view of course, and the associated drop in volume can add to that impression.
Clear with the different frequency and harmonic register of a Bass guitar, any impact on treble is significantly less audiable.
Once the volume is equalised out, you realise that there is really little tonal difference with the dummy engaged, except of course the welcome reduction in background hum. Check out the following sound clip to see.
This sound clips give a sense of the hum reduction based on a test guitar where the dummy coil is able to be switched in and out. The recordings were made with the test guitar laying flat, giving the highest level of background mains hum (try this yourself!).
It starts with the dummy coil off and a note played. After the note has faded, at 14 secs the coil is switched on giving the significant reduction in background hum. At approximately 25 seconds, the coil is switched off giving the jump in background hum.
So the above prototype seems to fulfil all of the design goals set. Hopefully, I will have it production ready a little later this year, and on sale through the Ironstone Pickups website.

Check out some more chat on the subject at;
basschat.co.uk/topic/194001-hum-cancellation-coils/
www.bestbassgear.com/ebass/gear/electronics/pickup/what-counts-as-a-humbucking-pickup.html
SSS HSH pickup conversions on a Strat can be quite a big deal, requiring body routing re-wiring and of course the selection and purchase of a set of Humbuckers.
So what if you want the versatility and tonal qualities of one or 2 humbuckers but you don't want to lose the look and tone of your favourite Strat by changing pickups? Well there is a simple wiring modification that could get you to a very interesting SSS HSH solution.
Single coil versus humbucker pickups;
There has been plenty written about the differences in tone between humbuckers and single coil pickups. That includes the 'fatness' of tone and noise cancelling abilities of a humbucker. Yet at its heart, a humbucker is just 2 single coil pickups, connected in series and with Reverse Winding directions and Reverse Magnet Polarities between the 2 coils (RWRP). The noise cancelling comes from the RWRP configuration of the 2 single coils that make up the humbucker, and the fact they are mounted close together (side-by side). And of course similar hum cancelling is also present on a Strat in positions 2 and 4, where 2 RWRP single coils are connected together (in parallel). So that demonstrates the principle of the SSS HSH wiring modification that follows. For more details of pickup construction, see;
Ironstone's Electric Guitar Pickups Explained
The 'Pickup in Series' modification:
The basis of this SSS HSH wiring conversion is a wiring modification that when active, places a chosen pickup in series with whatever has been selected via the normal 5 way switch. This modification is used on Ironstone's own Gilmour plate and Telecaster feature Bridge in series options. The following sound clips from the Ironstone Telecaster set demonstrate the single coil / series tone change.
But for the SSS HSH modification, what is needed is to perform the modification as a 'middle pickup in series' configuration. This requires nothing more than a small change to the wiring and a basic SPST switch (e.g. a mini toggle or pot mounted push-pull). The wiring diagrams for this are available in several places on the internet, so rather than go through them again, use these excellent links.

thefret.net/showthread.php/17947-Pickup-Wiring-Mod-for-my-Squier-CV-60s-Strat
premierguitar.com/articles/Adding_Series_Switching_To_Your_Strat
phostenixwiringdiagrams/strats#StratSeriesBlend
Available switching options;
So you have done the mod, what switching options do you now get?
Toggle switch off, normal Strat 5 way
 Position 1 = Bridge pickup only
 Position 2 = Bridge + Middle in parallel
 Position 3 = Middle pickup only
 Position 4 = Middle + Neck in parallel
 Position 5 = Neck pickup only
Toggle switch on, Strat 5 way + 'Humbucker'
 Position 1 = Bridge + Middle in series 'simulated Bridge humbucker'
 Position 2 = Middle pickup only
 Position 3 = Middle pickup only
 Position 4 = Middle pickup only
 Position 5 = Neck + Middle in series 'simulated Neck humbucker'
 .
If you want to get a little more adventurous still, you can consider adding some other switching to the number 2 and 4 positions, such as switching in different tone capacitors etc. To do that you need to free up the second half of the 5 way switch and get inventive. See; 5 Way switching tricks & tips.
In fact there is wealth of information out there on the web already, so I am not going to duplicate the brilliant efforts of others. Highlighted below are 4 of the best sites. Each has its own compendious listings of diagrams for every guitar and combination you can imagine! So dive in and see what is out there. If you are serious about custom modding, its worth investing in a cheap and cheerful guitar just to experiment on, before your pride and joy gets some treatment. Enjoy!
So maybe that HSH combination has been hiding inside your Strat the whole time just waiting for the SSS HSH wiring modifications.

Fender Squier upgrades are a very popular guitar forum topic, yet Squier's receive quite mixed reviews from both the industry and guitarists alike. Clearly their pricing compared to a 'real' Strat (I'm leaving aside Squier Teles in this blog) implies a more budget instrument. Yet its probably the instrument that starts off many a players career / hobby. When the original Japanese built Squier's began to be imported into America (fall of 1983), they became an instant success, the fact they were almost half the price of a regular Strat ($369 compared to $699)no doubt a big factor. A quote of the time (taken from 'The Fender Stratocaster' by A.R. Duchossoir) states that;
"It (Squier) didn't have any features likely to interfere with the sale of American models", yet the humble Squier probably saved Fender financially in 1985.
Since their inception Squier Strat's have gone through many model variants and new countries of origin. But the basic no nonsense formula has remained, perfect for Fender Squier upgrades.
So I'll start off by saying that I am not trying to say the materials and finish of a Squier matches an American standard. But they are potentially 'mechanically' excellent budget instruments. In fact, as the prices they are now fetching shows, original Japanese and Korean manufactured Squier's are quite highly prized.
Ironstone Pickups actually began in business building Gilmour Black Strat 'tributes' based on mid-90's MIK Squiers. Some of the nicest maple on maple necks I have ever seen.
Fender Squier upgrades: Pickups
So lets begin with the pickups, the heart of any guitar's tone. As a primary product differentiation for Fender, Squier's are typically supplied as stock with ceramic magnet pickups, typically of quite low windings. I have come across examples down in the 4kOhm range, which coupled to the ceramics is a recipe for thin, brittle tone.
So I would argue that an upgrade to an Alnico magnet based pickup is a major upgrade step towards getting vintage tone out of a Squier. And that's exactly what the Ironstone Strat pickup range (all Alnico V) are designed to do. For more technical detail of pickup construction, check out the Ironstone page;
Electric Guitar Pickups Explained
Whichever Ironstone (or other brand!) Alnicos you go for, you are after a fatter, warmer less shrill tone than the stock pickups. The full Ironstone Stratocaster pickup range includes the;
Silvers
Golds
Platinums
Hybrids
And check out the sound clips pages too;
Sound Clips

Ironstone Strat Pickups Platinum Alnico V
Fender Squier Upgrades; Electrics
It is not always necessary to change / upgrade the basic guitar electronics when replacing pickups. But in the case of Squiers, particularly older ones it is advisable. My personal recommendation value wise for Stratocaster configurations is 250kOhm Log / Audio style potentiometers for all 3 volume and tone controls, along with a 22nF (0.022uF) capacitor. This combination gives a very smooth tone sweep rather than the somewhat 'on / off' that is the result of other values & styles. I am deliberately focusing on the values rather than the brand; there is already plenty on the web claiming brand A capacitors sound so much better than brand B etc etc. Wire quality is another hot forum topic (Ironstone use shielded audio wire for the pickup connection for example), but in truth the quality of the soldering is just as important. Practise first if you are new to soldering!
For detailed information check out the Ironstone page;
Guitar Potentiometers and Capacitors
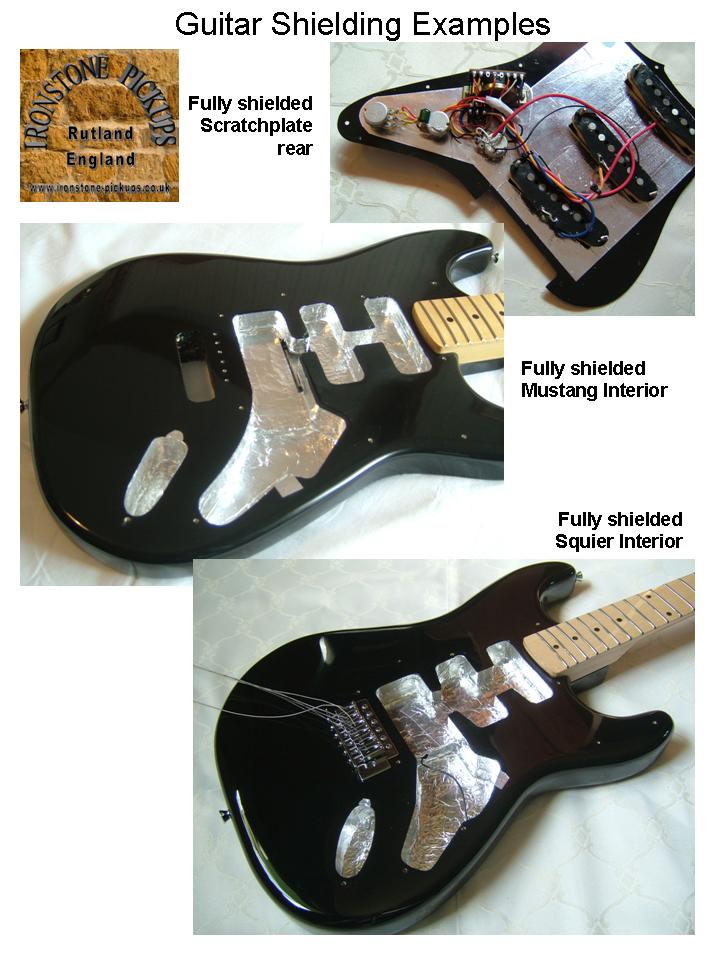
Whilst not strictly part of the 'electrics', no single coil pickup upgrade (especially Fender Squier upgrades) advice would be complete without a mention of guitar shielding. There are 2 main strategies for removing noise from a single coil pickup, shielding and cancelling.
Shielding is normally an effective way of minimising Buzz, but it cannot effectively remove Hum. For information on wiring and shielding see;
Electric Guitar shielding
Guitar Pickup Wiring
So to finish off, here are a few more upgrade ideas;

Best-upgrades-for-a-fender-squier-stratocaster/
Guitars / Squier upgrade
Hopefully this Fender Squier upgrades Blog will stimulate some thinking and tempt a few more owners to have a go. Enjoy!

So here is the last and most complex bit of guitar pickup testing kit in this blog mini-series.
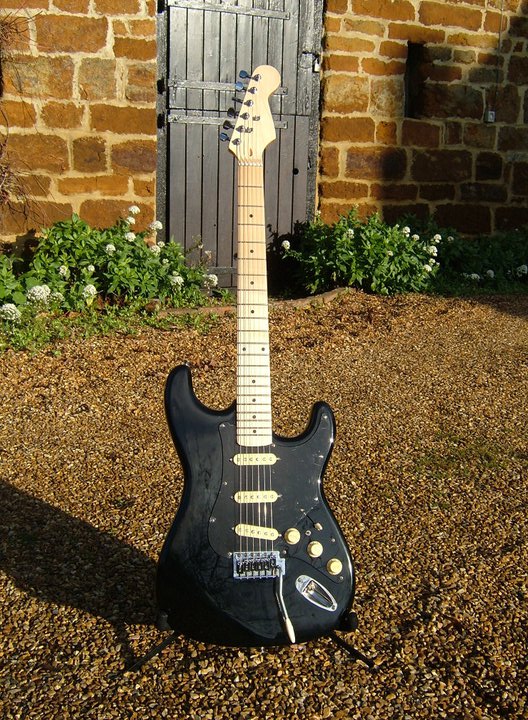
Unlike the previous examples, the idea here was to maximise the experimentation possibilities with Strat wiring. So the speedy interchangeability of the pickups is a secondary consideration. The key then was to have the ability to experiment and alter the control gear and wiring with the pickups (and strings of course) intact. Because the tone, and variations were much more important, this guitar also needed to play pretty well. So it was based on an inexpensive after-market neck and a solid body with swimming pool routing. Once again, I must say how useful the swimming pool routing is when it comes to guitars to experiment on. All that extra space makes wiring easier, allows more switch gear to be installed (and is great for all forms of active electronics and the associated battery).
A few more switches than usual, but otherwise a fairly normal looking Strat clone. Note the 'split' line across the scratchplate, parallel to and just below the strings.

Note the bridge slot can take a single coil or humbucker (that's silver foil cavity shielding you can be through the gap).

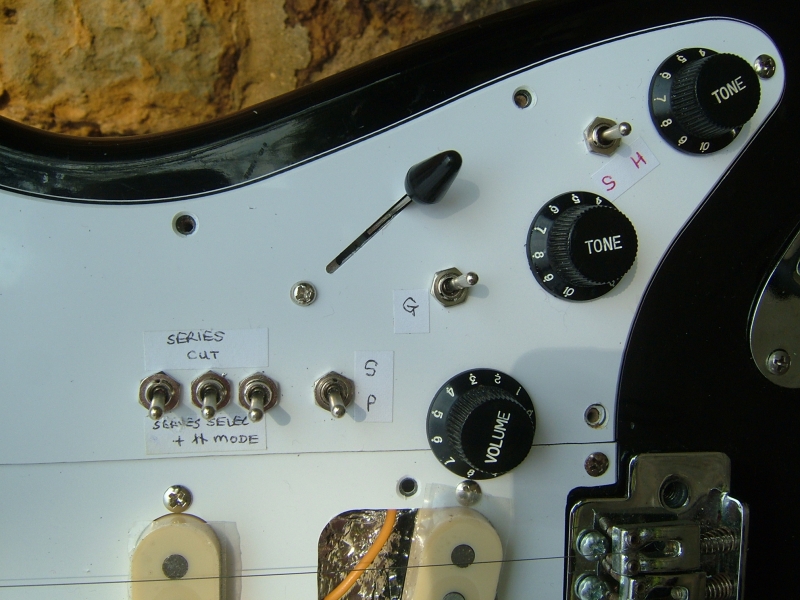
The 5 way switch and volume / tone controls are pretty standard. Things do get changed about fairly often, and when these shots were taken, one of the mini toggles was a tone capacitor selector for A / B comparisons. I had never been convinced just how much tonal difference there was between different cap manufacturers.....).
The main feature of the current switching set-up is the parallel / series configurators. With the S / P switch in P position, its a normal parallel configured guitar working off the 5 way switch. But put in the S position, it becomes a full series mode guitar. The 5 way is disabled and the row of 3 mini toggles allows any combination of the 3 pickups in full series.
If you have never played or heard a series configured single coil guitar its quite a treat. Assuming it has the conventional RWRP middle pickup, you can get some impressive quasi humbucker tones (both in volume, 'fatness' and hum cancelling).
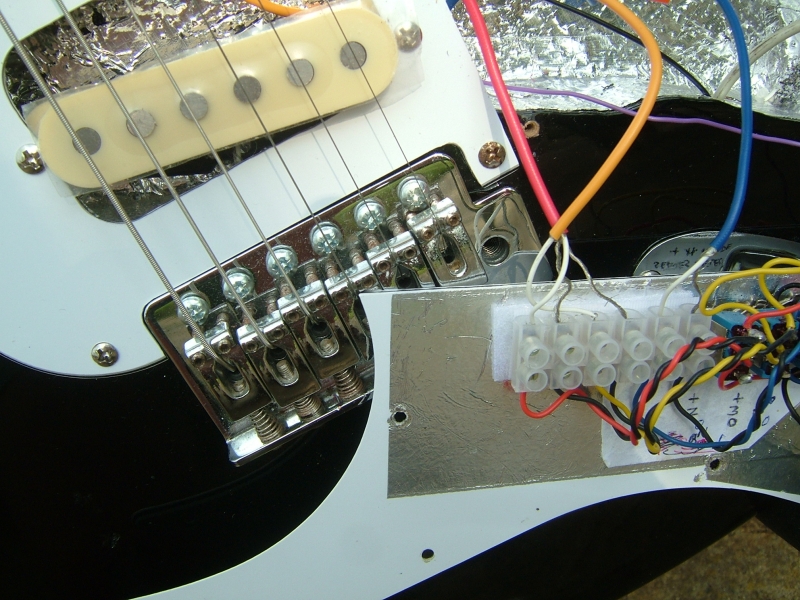
Finally, a quick look under the covers. Here you can see the lower part of the scratchplate removed for access and the terminal block pickup connection method. Not recommended as a secure connection before you step in fount of a Stadium full of people, but great for ease of experimentation.
The wiring around the switches themselves is of course an ever changing feast, and the best way to keep track is some form of updated circuit diagram. Though sometimes when you get an idea and a need to tinker, any kind of circuit diagram lags far behind!
If you feel the need for some regular experimentation, its well worth having an inexpensive guitar modified for some easy(er) tinkering. And of course there are plenty of other cool examples out there too.
For as many switches as you can fit on a guitar, my personal fav from a google search has to be;

Part 1 of this Blog mini series explored a dedicated guitar pickup tester solution to allow individual or sets of pickups for a Strat to be quickly and easily inserted, played and thus evaluated.
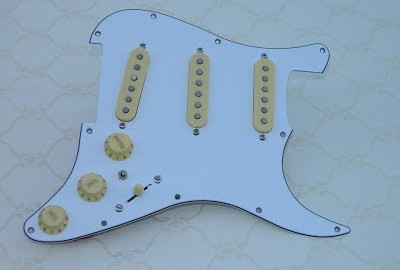
But what if you want to test a complete Stratocaster scratchplate / pickguard assembly? The same initial problems apply, i.e. the need to completely de-string to even get the plate off.
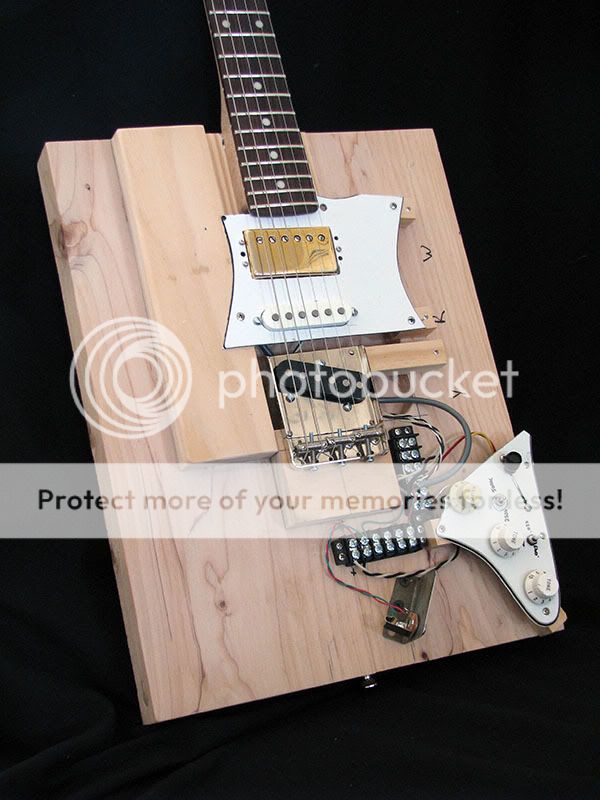
So at Ironstone we came up with our own 'Skeleton Strat' guitar pickups tester solution. The criteria for this design was (similar to the guitar featured in part 1) a very quick way to mount and connect a Strat scratchplate in a 'playable' (we come back to that later) guitar mount. It was always anticipated that the basic Strat scratchplate could also be used to house other guitar pickup types or even configurations like a Telecaster too.
After some tinkering, the Skeleton Strat was born.
Cosmetics aside, its obvious all of the main bits of a guitar are present. It has a body (sort of!) and normal neck, a (fixed) bridge, strings and tuners.


Its not a solid body of course, consisting of a back plate and a series of wooden support blocks onto which the scratchplate will be mounted.
The tricky bit is how to get the scratchplate under the strings without needing to remove them first. There were some trails with  a mechanism to hinge the bridge up out of the way, but it was all getting quite complex.
So a far simpler approach was finally chosen. Not only are the wooden support pieces set low enough that a plate complete with pickups can go under the strings, but the small (natural wood finish) arm on the lower left of the photo also swings out of the way to allow the potentiometers etc to pass by. Its then simply swung back into place to support the end of the scratchplate. Four screws hold the plate firmly in place, and a pair of croc clips allow connection from the plate to the amplifier via a jack socket on the same arm. That's the Skeleton Strat guitar pickups tester.
Coming back to that 'playable' comment there are 2 limitations / features of the design that are worth noting. Firstly, the string to pickup gap is considerably larger than on a conventional guitar with a proper height set up. That means the pickups are less sensitive to the string vibrations, but perfectly adequate to test a completed scratchplate assembly using 'known' performance pickups. Secondly (and more annoyingly), the bridge to nut length has had to be extended somewhat to allow for the plate to slide in. Consequently, intonation is not perfect, and playing higher up the fretboard gives some interesting results!
But even so, this allows a full check of not only the pickups, but all of the scratchplate controls, from basic switching to ensuring that pots are fully working and free from noise.
The original design as mentioned was very much aimed at the issues of testing Strat scratchplate / pickguard assemblies. But since the original design was done, scratchplate assemblies have been put together to allow testing of;
 Telecaster control plate assemblies,
 Jazz bass pickup switching prototypes
 Dummy coil test rigs
 Guitar pickup sustainers and many, many more.
The Skeleton Strat truly has a life of its own when it comes to guitar pickup testing!
For a few more ideas, check these out from the internet!


Without a dedicated guitar pickup tester, it only takes a few days experimenting with guitars and pickups before you realise that it can be quite a slow process. Telecasters, LPs and many other guitars at least allow easy access to the control circuitry. But of course a Strat needs a full de-string to achieve even that. And when it comes to changing and comparing pickups, things get even more time consuming, whichever model you mention.
So at Ironstone we have a number of guitar pickup tester rigs specifically to speed up or enhance testing, experimenting and general guitar related fun.
Hopefully some of these will give you ideas that you can use, they need no more than the sort of guitar parts or cheap donor guitars that many will have lying around.
Part 1 of this blog features a simple, yet highly modified guitar used for ultra-swift pickup installation and testing.
The first tester featured looks pretty normal from the front, a typical Strat copy.
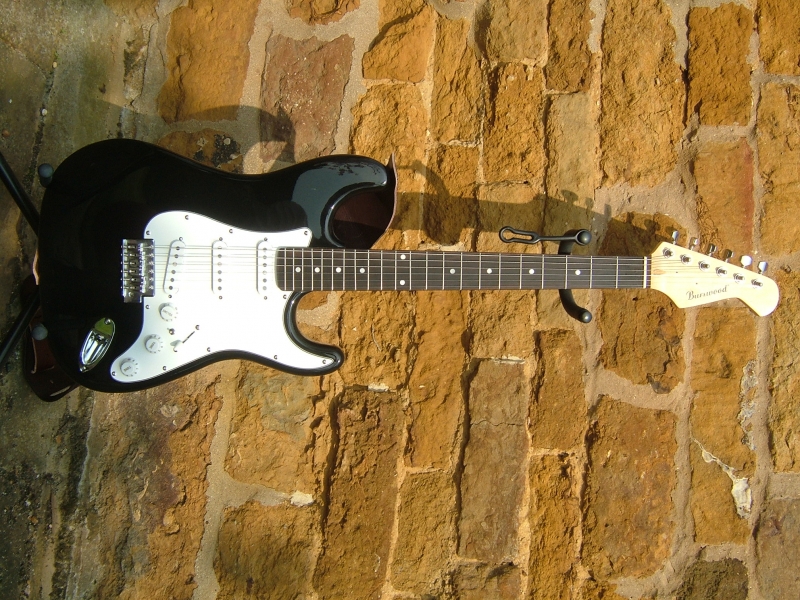
But viewed from the back things are somewhat different.
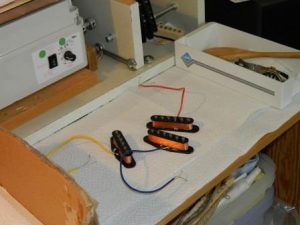
 A 'swimming pool' style body routing is a great start for many test style guitars, but this one goes further, with the entire centre section routed out (and the trem blocked to make it a static installation). The picture shows the silver foil covered underside of the top scratchplate, with the pickups simply pushed through the mounting slots. Small felt pads give a workable height setting between the top of the pickups and strings. The electrical connections to the pickups are via the croc clips, which are themselves hard wired back to the scratchplate electrics.
 The pickups are held in place by 2 slabs of foam. The first one simply presses the pickups into place, and allows the croc connections to be made away from the conductive foil scratchplate covering.
Finally, a second block of foam holds all of the croc clip connections securely, and applys a little more pressure to the pickup mounting.

Once this is in place, the tension of the slightly over-sized foam blocks holds everything quite firmly in place. The guitar is now fully playable without a full de / re-string.
In fact the time from start to a complete new set of pups in place and ready to play is no more than 2 minutes - perfect!
There are plenty of variations on this theme of course, and hopefully this example will get your creative juices flowing!
The next blogs in this series will feature a scratchplate tester and our most complex multi switcher Strat. Plenty for the enthusiastic guitar pickup tester to enjoy!
For a few more ideas and commercially available options, check these out;
https://www.youtube.com/watch?v=yZZkvvWMz3A
http://www.lundgren.se/about/mick-testgitarr-pa-vit-duk/